Spring 容器初始化过程
2021-11-12 [spring
context
]
bean 容器作为 spring 的核心功能,IoC/DI 都建立在其之上。这篇文章主要讨论 spring 如何初始化容器。
术语解释
- Bean: 在 java 的世界里,每个对象实例又称为 bean。(咖啡豆之于咖啡)
- Context(container): 应用里会有很多对象,spring 都把它们放在一个叫 context 的容器类里,需要的时候调用
context.getBean(beanName)即可 - IoC(Inverse of Control): 控制反转,直白地说就是开发者只负责实现具体的功能(类的方法),程序启动后,由 spring 负责类的实例化(new 出来)
- DI(Depedency Injection): 依赖注入,spring 将类实例化之后,类之间的组装也交给 spring 完成。
context 初始化流程
下图展示了 ApplicationContext 类在启动时主要的步骤。让我们依次来看下。
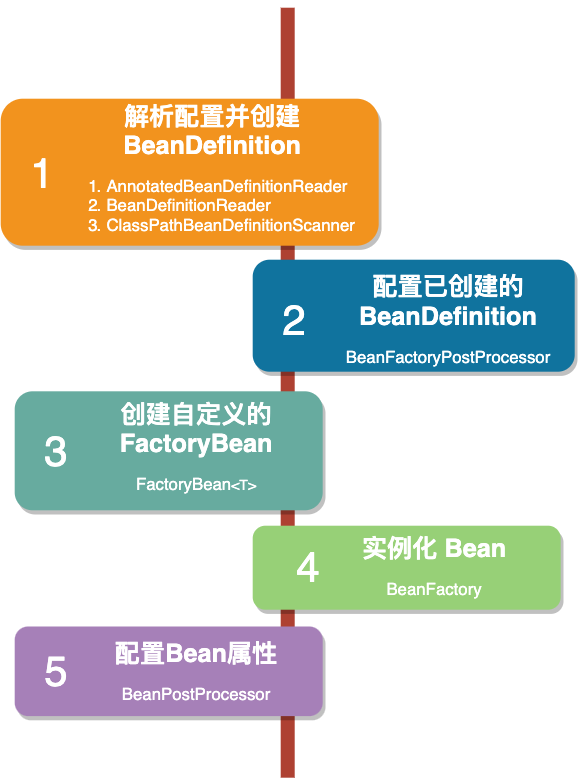
解析配置并创建 BeanDefinition
在 spring 发布了第 4 个大版本后,我们有一共有以下 4 种方式来配置应用:
- xml 配置: 即采用最经典的
ClassPathXmlApplicationContext("context.xml") - 通过配置需要扫描的 package:
AnnotationConfigApplicationContext("package.name") - 通过
@Configuration注解指定需要扫描的 class:AnnotationConfigApplicationContext(JavaClass.class),和以上两者不同,这种方式通过 java 代码实现。 - groovy 配置:
GenericGroovyApplicationContext("context.groovy")
第 1 步的主要目的是创建所有的 BeanDefinition . BeanDefinition 是一个特殊的接口,通过它你可以获取 bean 的 metadata。 这 4 种类型的配置,每种的解析机制各不相同。
xml 配置
对 xml 配置来说,spring 会使用 XmlBeanDefinitionReader 。它实现了 BeanDefinitionReader 接口。
XmlBeanDefinitionReader 拿到 InputStream 对象,通过 DefaultDocumentLoader 将 xml 文档加载进来。
然后 xml 文档中的每个 bean 元素(<bean />) 会被解析成 BeanDefinition ,并且将元素的属性 (id, name, class, alias, init-method 等) 赋值到 BeanDefinition 上。
所有的 BeanDefinition 会被放置到一个 Map 中, Map 位于 DefaultListableBeanFactory 类中。代码如下:
/** Map of bean definition objects, keyed by bean name */
privatefinal Map<String, BeanDefinition> beanDefinitionMap = new ConcurrentHashMap<String, BeanDefinition>(64);
通过指定扫描的 package 或 @Configuration 的代码配置
这种指定 package 的方式,或者 java 代码的方式和上述 xml 配置大不相同。
这种方式的主要实现类是 AnnotationConfigApplicationContext
new AnnotationConfigApplicationContext(JavaConfig.class);

// or

new AnnotationConfigApplicationContext("package.name");
如果你尝试阅读 AnnotationConfigApplicationContext 代码,会发现有两个属性:
private final ClassPathBeanDefinitionScanner scanner;
private final AnnotatedBeanDefinitionReader reader;
ClassPathBeanDefinitionScanner 负责扫描 package 或者被 @Component 注解的 class。
为了启用 scan 特性,需要如下配置:
// java
@ComponentScan({"package.name"})

// or xml
<context:component-scanbase-package="package.name"/>
AnnotatedBeanDefinitionReader 需要做以下几件事情:
第一是注册所有带 @Configuration 的类以便稍后解析。如果 @Conditional 出现在上面,需要运行其中的表达式,只有结果为 true 的 class 才会被注册。
@Conditional 出现在 spring 4 中,用于在容器初始化时,根据条件配置 bean 和 @Configuration。
第二是注册一个特殊的 BeanFactoryPostProcessor,称为 BeanDefinitionRegistryPostProcessor, 该类使用 ConfigurationClassParser 解析 java 配置,并转化为 BeanDefinition.
Groovy 配置
这种配置方式和 xml 很相似,除了解析文件从 xml 变为 groovy。
解析工作由类 GroovyBeanDefinitionReader 负责。
配置创建的 BeanDefinition
在经过第一步之后,我们有一个负责存储 BeanDefinition 的 Map。
spring 框架为开发者提供了在 bean 被创建之前干预的机制,换言之,开发者可以获取 class 的 metadata。
获取的方式是实现 BeanFactoryPostProcessor 接口,该接口只有一个方法。
public interface BeanFactoryPostProcessor {
  void postProcessBeanFactory(ConfigurableListableBeanFactory beanFactory) throws BeansException;
}
postProcessBeanFactory 方法接受一个 ConfigurableListableBeanFactory 参数,
它包含了许多有用的方法,通过这些方法,我们可以获取所有的 BeanDefinition 的 Names,以及通过指定的 name 获取 BeanDefinition 对象。
String[] getBeanDefinitionNames();

BeanDefinition getBeanDefinition(String beanName) throws NoSuchBeanDefinitionException;
我们来看一个 spring 实现的 BeanFactoryPostProcessor 的例子。
通常,我们会把数据库连接的配置写在一个 properties 文件里,然后,使用 PropertySourcesPlaceholderConfigurer 加载配置值并注入到对应的字段上。
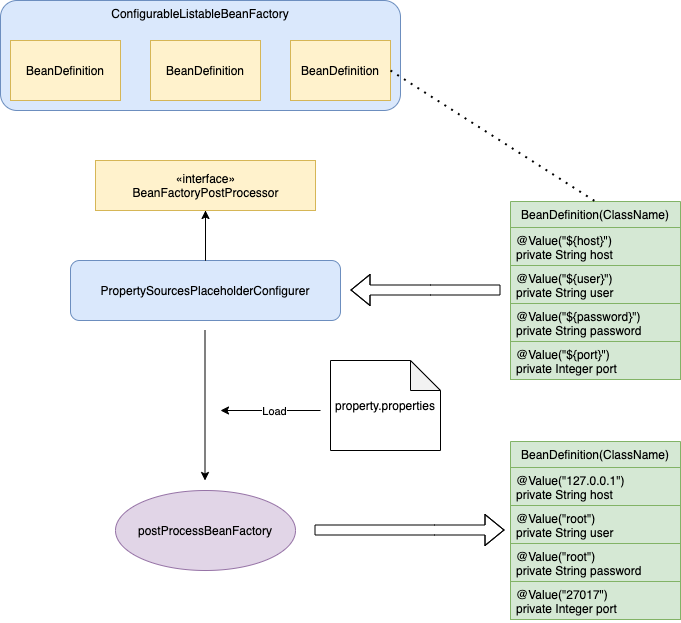
让我们来仔细看下这里发生了什么。假设我们已经有一个 BeanDefinition,它的类型是 ClassName,代码如下:
@Component
public class ClassName {
  @Value("${host}")
  private String host;

  @Value("${user}")
  private String user;

  @Value("${password}")
  private String password;

  @Value("${port}")
  private Integer port;
}
如果 PropertySourcesPlaceholderConfigurer 没有处理 BeanDefinition,在创建 ClassName 实例之后,
${host}的值将会注入到 host 字段上。
如果 PropertySourcesPlaceholderConfigurer 处理之后,其 metadata 将会变成这样:
@Component
public class ClassName {
  @Value("127.0.0.1")
  private String host;

  @Value("root")
  private String user;

  @Value("root")
  private String password;

  @Value("27017")
  private Integer port;
}
对应的配置值会注入到相应的字段上。
为了 PropertySourcesPlaceholderConfigurer 起作用,还需要进行如下配置:
<context:property-placeholder location="property.properties" />
或者以 java 代码的形式:
@Configuration
@PropertySource("classpath:property.properties")
public class DevConfig{
  @Bean
  public static PropertySourcesPlaceholderConfigurer configurer() {
    return new PropertySourcesPlaceholderConfigurer();
  }
}
PropertySourcesPlaceholderConfigurer 必须被声明为 static。
否则,它只会对 @Configuration 里的 @Value 生效。
创建自定义的 FactoryBean
FactoryBean 是用来把创建 bean 过程从 spring 委托给开发者的通用接口。
在过去 bean 的配置只依赖 xml 的日子里,开发者需要一种机制来控制 bean 的创建。
这正是 FactoryBean 干的事情。为了更好地理解,我们来看个 xml 配置的例子。
<?xml version="1.0" encoding="UTF-8"?>
<beans xmlns="http://www.springframework.org/schema/beans"
       xmlns:xsi="http://www.w3.org/2001/XMLSchema-instance"
       xmlns:context="http://www.springframework.org/schema/context"
       xsi:schemaLocation="http://www.springframework.org/schema/beans
                           http://www.springframework.org/schema/beans/spring-beans.xsd
                           http://www.springframework.org/schema/context
                           http://www.springframework.org/schema/context/spring-context.xsd">

  <bean id="redColor" scope="prototype" class="java.awt.Color">
    <constructor-arg name="r" value="255" />
    <constructor-arg name="g" value="0" />
    <constructor-arg name="b" value="0" />
  </bean>
</beans>
起初一切都很好,但是当你要另一个 Color 的实例时该怎么办呢,再创建一个 bean ?没问题:
<?xml version="1.0" encoding="UTF-8"?>
<beans xmlns="http://www.springframework.org/schema/beans"
       xmlns:xsi="http://www.w3.org/2001/XMLSchema-instance"
       xmlns:context="http://www.springframework.org/schema/context"
       xsi:schemaLocation="http://www.springframework.org/schema/beans
                           http://www.springframework.org/schema/beans/spring-beans.xsd
                           http://www.springframework.org/schema/context
                           http://www.springframework.org/schema/context/spring-context.xsd">

  <bean id="redColor" scope="prototype" class="java.awt.Color">
    <constructor-arg name="r" value="255" />
    <constructor-arg name="g" value="0" />
    <constructor-arg name="b" value="0" />
  </bean>

  <bean id="green" scope="prototype" class="java.awt.Color">
    <constructor-arg name="r" value="0" />
    <constructor-arg name="g" value="255" />
    <constructor-arg name="b" value="0" />
  </bean>
</beans>
但是,假如我们需要每次生成一个随机的颜色又该如何?这正是 FactoryBean 发挥作用的地方。
让我们来实现一个 FactoryBean 来负责所有 Color 实例的创建。
package com.malahov.factorybean;
import org.springframework.beans.factory.FactoryBean;
import org.springframework.stereotype.Component;
import java.awt.*;
import java.util.Random;

/**
 * User: malahov
 * Date: 18.04.14
 * Time: 15:59
 */
 public class ColorFactory implements FactoryBean<Color> {
  @Override
  public Color getObject() throws Exception {
    Random random = new Random();
    Color color = new Color(random.nextInt(255), random.nextInt(255), random.nextInt(255));
    return color;
  }

  @Override
  public Class<?> getObjectType() {
    return Color.class;
  }

  @Override
  public boolean isSingleton() {
    return false;
  }
}
再将它加入到 xml 的配置文件中:
<?xml version="1.0" encoding="UTF-8"?>
<beans xmlns="http://www.springframework.org/schema/beans"
       xmlns:xsi="http://www.w3.org/2001/XMLSchema-instance"
       xmlns:context="http://www.springframework.org/schema/context"
       xsi:schemaLocation="http://www.springframework.org/schema/beans
                           http://www.springframework.org/schema/beans/spring-beans.xsd
                           http://www.springframework.org/schema/context
                           http://www.springframework.org/schema/context/spring-context.xsd">

  <bean id="colorFactory" class="com.malahov.temp.ColorFactory" />
</beans>
现在,创建 Color 的实例将会被委托给 ColorFactory,由它的 getObject 方法返回创建的 bean。整体流程如下:
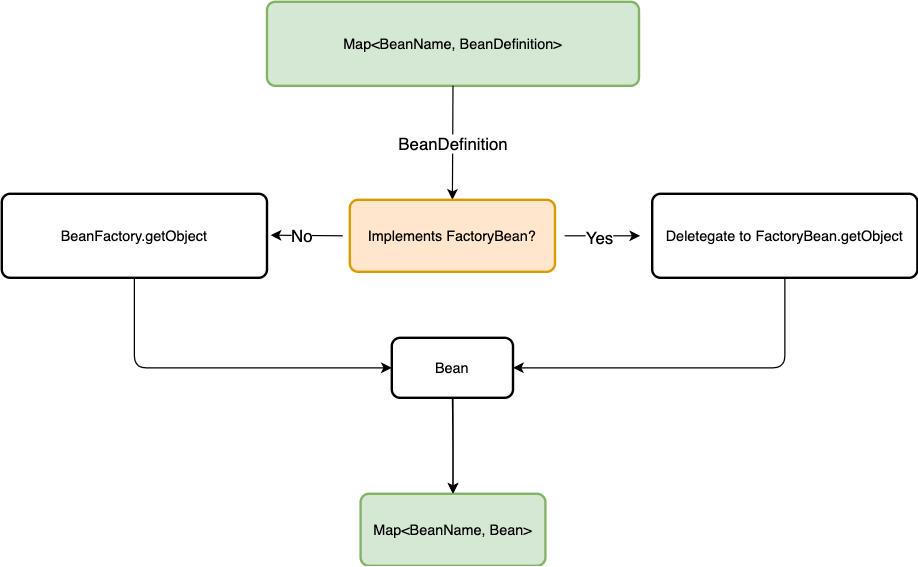
如果你采用 java 代码配置 beans,这个接口就没啥用了。
实例化 bean
BeanFactory 负责创建实例化 bean,如果有必要,它将会把创建的过程委托给 FactoryBean。
实例化 bean 正是基于之前解析出的 BeanDefinition。
配置已创建的 bean
BeanPostProcessor 接口允许你对创建好的 bean 进行若干设置,该步骤会织入在 bean 加入 container 之前。
public interface BeanPostProcessor {
  Object postProcessBeforeInitialization(Object bean, String beanName) throws BeansException;

  Object postProcessAfterInitialization(Object bean, String beanName) throws BeansException;
}
两个方法都会对所有的 bean 调用,它们的参数也都一样。 唯一的区别是两个方法调用的顺序。顾名思义,第一个方法在 init 方法前调用,第二个在 init 方法后被调用。
值得一提的是,我们要明白,在调用方法的时候,bean 已经被创建好,而且正在被重新配置。
由两点需要明确:
-
两个方法最后都会返回 bean 实例。如果你返回 null,当你之后从 context 获取该 bean 的时候,你就会得到 null。 因为所有的 bean 都会过
BeanPostProcessor,在 context 初始化完成后,当你再请求 bean 时,你只会得到 null。 -
如果你希望生成一个 proxy 类(类似 spring 的 aop),记住代理类需要在 init 方法之后生成,换句话说,务必将生成 proxy 的逻辑放在
postProcessAfterInitialization方法中。
具体的流程如下图所示,调用 BeanPostProcessor 的顺序我们不得而知,但是,我们知道它们是顺序执行。
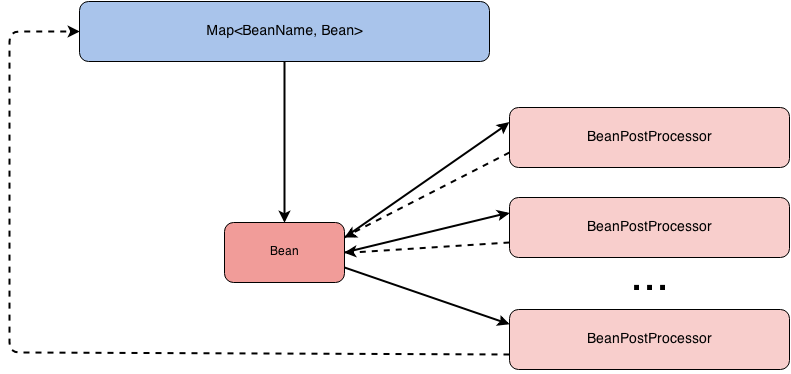
为了更好的理解,我们来看个例子。
在开发大型项目的时候,开发团队会被分成多个小组。比如负责项目基础设施的公共组件组,还有使用这些组件的业务开发组。 假设业务开发组需要一个功能是生成随机数,并注入到 bean 的字段中。
首先,我们编写一个注解,用于标记这些待注入的字段。
@Retention(RetentionPolicy.RUNTIME)
@Target(ElementType.FIELD)
public @interface InjectRandomInt {
  int min() default 0;
  int max() default 10;
}
默认情况下,随机数的范围时 0 到 10.
然后,我们编写该注解的处理逻辑,即一个负责处理该注解的 BeanPostProcessor 实现类。
@Component
public class InjectRandomIntBeanPostProcessor implements BeanPostProcessor {
  private static final Logger LOGGER = LoggerFactory.getLogger(InjectRandomIntBeanPostProcessor.class);
  @Override
  public Object postProcessBeforeInitialization(Object bean, String beanName) throws BeansException {
    LOGGER.info("postProcessBeforeInitialization::beanName = {}, beanClass = {}", beanName, bean.getClass().getSimpleName());
    Field[] fields = bean.getClass().getDeclaredFields();
    for (Field field : fields) {
      if (field.isAnnotationPresent(InjectRandomInt.class)) {
        field.setAccessible(true);
        InjectRandomInt annotation = field.getAnnotation(InjectRandomInt.class);
        ReflectionUtils.setField(field, bean, getRandomIntInRange(annotation.min(), annotation.max()));
      }
    }
    return bean;
  }

  @Override
  public Object postProcessAfterInitialization(Object bean, String beanName) throws BeansException {
    return bean;
  }

  private int getRandomIntInRange(int min, int max) {
    return min + (int)(Math.random() * ((max - min) + 1));
  }
}
BeanPostProcessor 的代码非常简单,但需要注意的是 BeanPostProcessor 必须先实例化。要么通过 @Component 注解,要么在 xml 中声明。
公共组件组完成了任务,该轮到业务开发组来使用它了:
@Component
@Scope(ConfigurableBeanFactory.SCOPE_PROTOTYPE)
public class MyBean {
  @InjectRandomInt
  private int value1;

  @InjectRandomInt(min = 100, max = 200)
  private int value2;

  private int value3;

  @Override public String toString() {
    return "MyBean{" +
            "value1=" + value1 +
            ", value2=" + value2 +
            ", value3=" + value3 +
            '}';
  }
}
结果,所有从 context 中获取的 MyBean 实例,将会拥有已经被初始化的 value1 和 value2 字段。
还值得注意的是,将值注入这些字段的阶段取决于你的 bean 具有什么样的 @Scope。
- SCOPE_SINGLETON - 初始化将会在 context 初始化时发生
- SCOPE_PROTOTYPE - 初始化将会在每次从 context 请求 bean 的时候发生
在第二种情况下,你的 bean 由于会经过所有的 BeanPostProcessor,可能会对程序性能有显著影响。